Software development has seen various technological innovations and novel development methods along with the changing times. Among them, a method called “no-code/low-code development” has been gaining attention.
Contec manufactures a variety of measurement and control devices, such as analog I/O devices, digital I/O devices, counting devices and motion control devices, which are used extensively by customers for inspection equipment and measurement systems.
When developing applications using Contec devices, you can use various languages and platforms, such as Python and Raspberry Pi, which are becoming increasingly popular. However, most people are probably most familiar with Windows-based computers.
In this blog post, we will introduce the development environment using Contec measurement devices and Windows Visual Studio, and application development using our newly released development support tools.
Contents
Visual Studio—the Obvious Choice for Windows Application Development
For readers of this blog, what kind of development environment do you choose when you develop applications on Windows?
When developing applications on Windows, a variety of development environments are available. For example, Eclipse and IntelliJ IDEA are indispensable for Java application development. PyCharm is well-known for Python, JavaScript, and TypeScript development. Node-RED and Scratch are representative of no-code/low-code development. In addition to the above, you can also use Visual Studio Code or Atom (or Vim and Emacs if you are experienced in Linux development) to develop applications without an integrated development environment (IDE), by writing code in a source code editor and compiling it separately.
However, when it comes to GUI application development on Windows, Visual Studio is probably the most well-known. An IDE provided by Microsoft—the developer of Windows—it is the best tool for developing applications on Windows computers thanks to its wealth of features and a large community where many users share information.
When developing applications in Visual Studio, you can choose from a variety of languages, including VB.NET and C# for easy application development on Windows, C++ for high-speed processing, and Python and TypeScript, which are becoming increasingly popular. For Contec measurement devices, we provide APIs that can be called from C++, C#, VB.NET, and Python.

Visual Studio comes with a variety of functions to support developers, and provides extensive support for application development with its IntelliSense and debugging functions.
For example, the IntelliSense function displays information about the source code directly in the editor during coding and completes your code based on what you type.
The methods and properties for classes appear in a list, and you can complete code by simply selecting what you need. This feature corrects syntax errors and typos that are common during coding, which helps to prevent build errors and greatly reduces the developers’ workloads.

Another feature of Visual Studio is that it allows you to develop graphical user interface (GUI) applications easily.
The following screenshot shows how you can create GUI applications in Visual Studio.
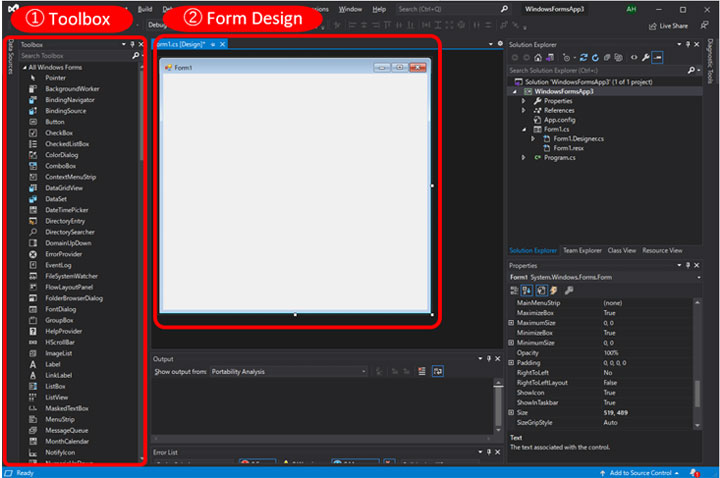
Basic parts for a GUI, such as buttons, text labels and check boxes, are grouped under “1. Toolbox.” You can create a GUI application easily—simply drag and drop the basic GUI parts from the toolbox to “2. Form Designer,” create your design, and specify how you want them to be processed.
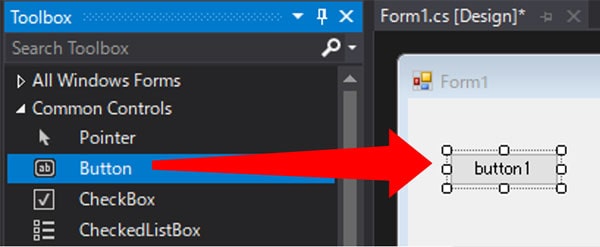
For example, to place a button on a form, you can simply drag it from the toolbox and drop it on the form.
If you go one step further and think of it as a platform for system development, development on Windows is very versatile.
Various hardware and software manufacturers provide their own development environments. If you use them, however, you are stuck with their development environment and may end up limited in your choices in terms of system configuration. If you are developing in Visual Studio, many manufacturers provide libraries that you can use, which allows you to build flexible systems.
In addition, the learning curve is gentle because of the availability of free and paid versions, free seminars, and a wide variety of books.
Contec’s .NET Component Collection Turns Visual Studio into a Low-code Development Tool
In the previous section, we introduced how you can develop applications using Visual Studio and its features. Contec has released development support software that allows for low-code development using Visual Studio and our devices. (Supported languages: C# and VB.NET)
Developing applications using Contec devices in Visual Studio used to be time-consuming because you needed to search for dedicated APIs and write code to display measurement data on the screen. To improve these labor-intensive tasks, we developed DAQ-DNC-FE, a tool that provides an easy way to configure and control devices, and to collect data and link them.
DAQ-DNC-FE offers features such as the measurement-specific components and high compatibility with Visual Studio. This blog post will focus on introducing how you can develop applications in three steps based on low-code development.
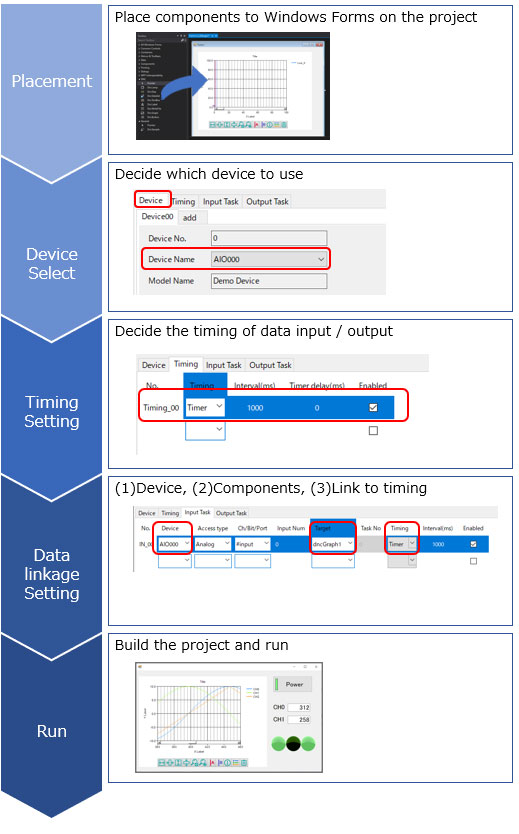
Feature of DAQ-DNC-FE: Quick app development in three easy steps
- Step 1: Drag and drop components
- Step 2: Associate components in the property settings panel (low code)
- Step 3: Begin (run build)
Step 1: Drag and drop components
After installing DAQ-DNC-FE, you can link its data simply by registering it in the Visual Studio toolbox, adding it to a form, and configuring it in the properties panel. Just like other components, you can add DAQ-DNC-FE components to forms by dragging and dropping them from the toolbox.

Step 2: Associate components in the property settings panel (low code)
DAQ-DNC-FE comes with a data linking function that allows you to display device data on a component, or send values that you have entered into a component to a device using only the settings on the GUI (low code). An overview of the data linking function is shown below.
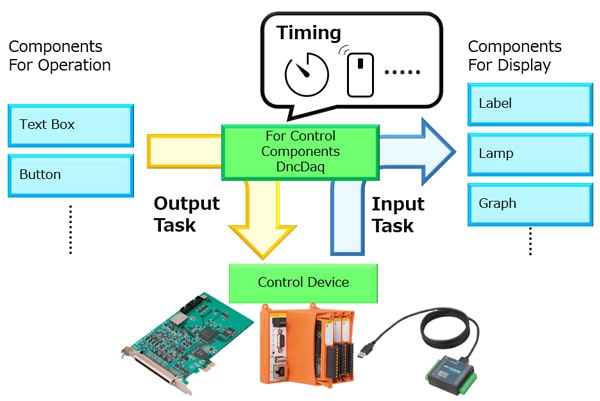
- Input task: Links data from the target device to the component.
- Output task: Sends the linked data from the component to the target device.
- Timing: Timing for running input and output tasks. You can select and configure the timing from timers or button clicks, among other choices.
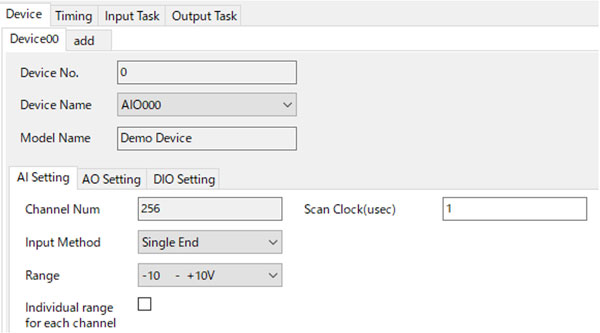
The data linking function is configured in DncDaq, a control component. Simply open the properties panel of the DncDaq component and the device names (a unique name used to identify each device) and model numbers of the devices connected to the computer are detected and displayed. This allows you to select the desired devices easily. (See figure below)
Step 3: Begin (run build)
After you have configured each component, you are ready to build and run your application.
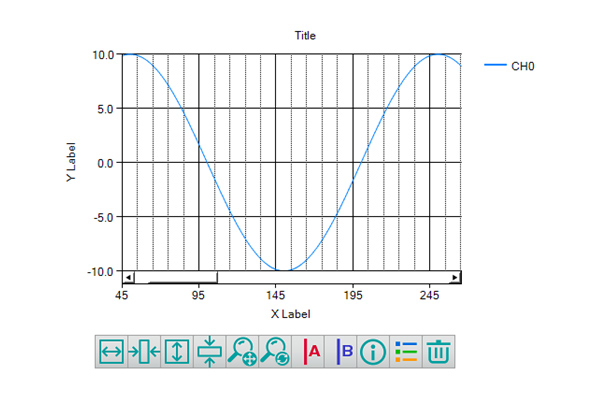
DAQ-DNC-FE provides not only simple labels and text boxes, but also components for displaying graphs (see figure below) and saving files to support development of measurement applications on Windows.
The New Development Style for Measurement Applications
In this section, we will explain what the new development style (low-code development) with Visual Studio+.NET component collection (DAQ-DNC-FE) is all about. To do so, we will look at an example of creating an application that graphically displays data measured by an analog I/O device.
-
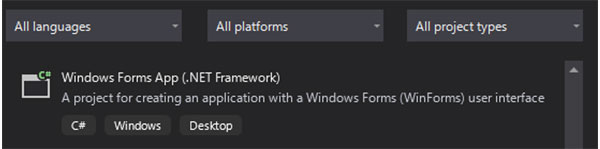
Let’s start by creating a project in Visual Studio.
After starting Visual Studio, select “Windows Forms App (.NET Framework)” from “Create a new project.” The languages supported are C# and VB.NET.
-
Place the DAQ-DNC-FE components in Form Designer. On the Windows form, place the DncDaq and DncGraph components, which link data from control devices and display the linked data in a graph, respectively.

-
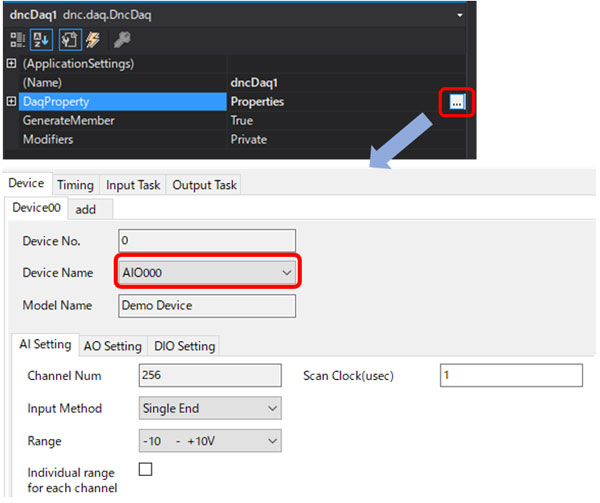
After placing the components on the form, configure DncDaq. Open the DncDaq property settings panel and select the device you want to use. In this case, we will use AIO000.
Topic
There are two modes in DAQ-DNC-FE: (1) Basic mode for easy creation of measurement applications and (2) Advanced mode for optimum use of device functions such as sampling and edge detection.
-
Once you have selected the device, open “Input Task Settings.”
From “Input Task Settings,” specify the device and the channel you want to use, and the timing for linking the data. In our example, we will link the voltage values of channels 0-2 to the graph component at 1 second intervals.

-
After configuring DncDaq, the next step is to configure the DncGraph.
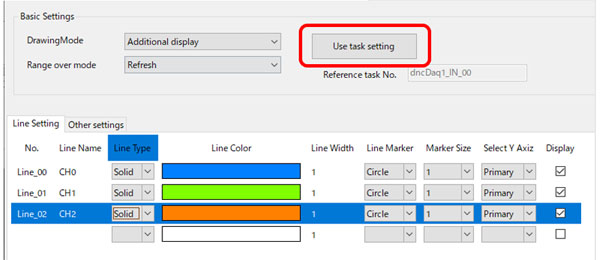
Configuring DncGraph mainly involves specifying the number of lines and the scale. If you use the “Reflect Task Settings” function to configure DncGraph, the graph is automatically configured according to the number of channels and the voltage range.
-
After completing the configuration, build and run the project.
This is all you need to do to create an application that generates a graphical display of measurement data at 1 second intervals.

What do you think? As you can see, you can easily create a measurement program using Contec devices without any coding. If you need more precise control or functional enhancements, you can also develop more advanced applications using events, methods, and properties. For further reading, we provide detailed documentation consisting of sample programs and online help.
Conclusions
- Visual Studio is the best development environment for developing applications on Windows, and Contec provides drivers (APIs) that can be used in Visual Studio.
- Contec has released DAQ-DNC-FE, which not only provides drivers for measurement devices, but also supports development of measurement control systems and applications by customers.
- We hope that your feedback will help us develop and improve our products in the future, so please download DAQ-DNC-FE together with Visual Studio and try low-code application development. We also offer a variety of support tools in addition to DAQ-DNC-FE and look forward to hearing from you.
Related Links
See All Blogs